—
Paul Andersen shows you how to use Screenflow, Keynote, and Omnidazzle to make an educational screencast.
—
—
Transcript Provided by YouTube:
00:00
00:07
Hi. This is Paul Andersen. I get lots of questions about how I put together my educational screencasts.
00:13
And so what I thought I would do is just kind of show you making one and how I do it. And
00:17
then kind of use that as a model to show you how to do one of your own. And so the software
00:23
that I’m going to run is three-fold. First thing I’m in is something called Keynote.
00:27
This is similar to PowerPoint on a PC. And what it does is allows you to set up your
00:32
presentation. The next piece of software I’m using is something called OmniDazzle. And
00:36
what that does is allows me to write on the screen using a pen. And then the last thing
00:42
is ScreenFlow. And so if you’re ever making one of these what you have to do is actually
00:46
capture what is going on on the screen. ScreenFlow does that. And it also is able to copy or
00:52
capture this video and the voice that’s coming through right now. So those are the three
00:56
pieces of software. Presentation software, pen software and then finally screen capture
01:02
software. And so the first thing I do is I actually put together a screen presentation.
01:08
Just like I’m going to lecture in class, I put down my ideas and kind of organize those
01:13
in to a sequence of slides. On each of those slides I leave a space so I can actually insert
01:21
video there when I get to the editing part. And so let’s take a stab at this. And so,
01:27
Hi. I’m Paul Andersen and welcome to educational screencast walkthrough. The hardware that
01:34
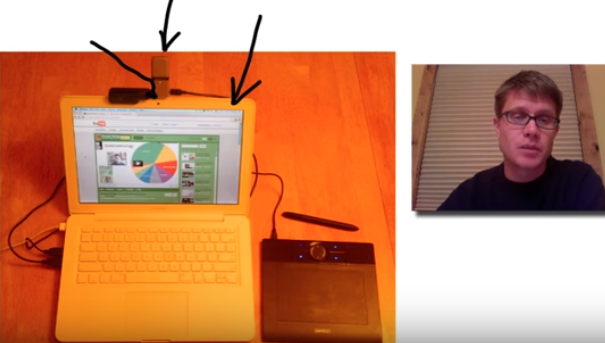
I’m loping at in front of me is sitting right here. I’ve really got four pieces of hardware.
01:39
First one is a computer. I’m running a MacBook. I’ve also got a microphone on the top that
01:45
allows me to pick-up a better kind of sounding voice then the one that’s built into the computer.
01:51
I also have a webcam. The webcam sits right there. So it’s picking up the video that you
01:56
see. And then finally the fourth thing that I have is a tablet. So let’s talk a little
02:01
bit about each of those in more detail. The computer I’m using is a MacBook. It’s a 2010
02:08
MacBook. Nice thing about it is it’s running the most up-to-date system software, 10.6.
02:15
The nice thing about that is most of the new screen capture software requires pretty up-to-date
02:22
software. And so you have to run, at least on the Mac side a 10.5 in order to use most
02:27
of the screen capture video. PC you want to run, you know you essentially want to have
02:32
a webcam if you can built in. And then you want to have the up-to-date software. And
02:37
I’m sure that you could run this on Linux as well. I’m just not familiar with that.
02:41
So again, if you’ve got a new computer that’s going to work great for this. Next thing you
02:46
need is a webcam. I don’t spend a lot of money on that. It’s just built into the computer
02:51
itself. It sits right here. Lots of times the video I’ll actually make them smaller
02:56
within the screencast. And so I don’t feel like I need a really high quality video camera.
03:00
I’m sure you could use an external video camera if you wanted to as well. But I’m happy with
03:04
the one that’s built in. It’s also nice as I move the computer around during the day.
03:08
I don’t have to worry about hooking up a camera. Next thing that I purchased was a microphone.
03:15
If you’ve seen some of my other screencasts you’ll notice that I used to wear these really
03:18
big dorky headphones. And the reason why wasn’t so I could hear, but so it would position
03:22
the microphone very close to my mouth. And so I kind of did away with that when I bought
03:28
this. This is a Samson Go Mike. The nice thing about it is it clips right here on the top
03:33
of my computer. And so it picks up my voice as I talk towards the video camera. And I
03:39
think it does a nice job of picking it up. I think it’s one of those things when you
03:42
are watching a video, you can’t tell, but you may like one video over another. And one
03:47
of the big things is that it just has higher quality sound. And so I think it’s worth spending
03:52
a little money to get a nice microphone. But I had to get one that didn’t really get in
03:56
my way. The last thing that I added this year is a tablet. This is a graphics tablet. Nice
04:03
thing about it is that you can actually write with a certain amount of precision on the
04:09
screen. And if I were to try to use just my mouse or my track pad I wouldn’t be able to
04:15
get that kind of clarity. The other nice thing about it is it has these buttons. And so I
04:19
can assign different functions for each of these buttons. So these ones on the top I
04:24
use to actually advance or go backwards in the slide show. I use this one to bring up
04:31
that writing software. And then I use this one to actually erase. And so if I hit that
04:37
button right there it erases everything that I actually just wrote. Okay. Now let’s get
04:42
to the software. Software side, what you need to start out with is presentation software.
04:48
And so the software I’m using again is Keynote. It’s nice for the Mac. It really works well
04:54
with iPhoto and bringing in things and resizing. But I could just as well be using PowerPoint
05:00
if I’m on a PC or even on a Mac for that matter. And so that’s the first thing you need. And
05:04
think out how you want to talk. What sequence of steps do you want to go through. And then
05:10
lay it out in Keynote. Next thing I use is screen capture. The screen capture software
05:15
I use is something called ScreenFlow. And so that’s actually recording everything that
05:20
I do right now. And you will be able to see it in just a minute or so. And so again it
05:25
captures what’s on the screen and then the video coming from the webcam as well. And
05:30
then the last thing I use is drawing software. So what I’m using is something called OmniDazzle.
05:35
I’ve looked at some other ones but this one seems to function the best. It just allows
05:41
me to scribble on the screen and then quickly erase it. Okay. I’ve done this for a little
05:47
while. And I’ve come up with my list things that I think would help you. First thing I
05:53
tried was adding, because I thought it was kind of boring, my presentation, so I had
05:57
music in the background. I found that that’s a really really really bad idea. Music is
06:03
just going to be a distraction. And so maybe a little bit at the beginning but then it
06:06
should just be voice. Next one, voice input. After you’re done making your video, I usually
06:12
make sure that that goes to mono. If you’re moving from side to side when you’re talking
06:17
it becomes really distracting. And so I can actually take all of that audio and then squeeze
06:22
it into one mono track. Because our voice is mono. It’s not stereo. Next thing I found
06:27
is that you should include your face. A lot of kids in my class really respond well to
06:33
seeing my face. And they thought it was kind of creepy when they couldn’t see it. And so
06:36
I think that’s been something good. And if you think about it all the videos on YouTube
06:40
that are popular are just somebody sitting in front of a webcam talking. Next one, zoom
06:47
in. In other words it’s really to hard to see the screen. Especially when you have text
06:52
on the screen at all. And so I try to zoom in as much as I can to give the viewer kind
06:57
of a good shot at what you’re trying to talk about. The next one I try to keep my videos
07:01
to ten minutes or less. This was, it was created by YouTube, this ten minute limit. And it
07:09
ended up being a nice thing for me. If my videos go much longer than that I think it’s
07:13
just too long and people tend to get bored. Even when I watch videos, man if I see something
07:18
that’s eight or nine minutes I’m willing to watch it. But if it gets much longer than
07:22
that I’m just not going to cash in. Okay. And then the last is that I just think YouTube
07:27
is really cool. So I put all of my videos on YouTube. You’re going to have the biggest
07:32
viewership. They do a nice job of letting you kind of customize how your videos are
07:36
going to be displayed on your site. And it’s just the biggest fish in the pond. And so
07:40
I love YouTube. Okay. So after I’m done with a video like that, now what’ll I’ll do is
07:46
ScreenFlow. I’m going to get out of this. And so I’m going to stop recording. And when
07:51
I do that my face is going to disappear and I’m going to have to show you what it looks
07:55
like on the inside. Okay. Now that I’ve quit screen flow, it shows me this video editor.
08:02
And so I can go back and look at myself in the video I just shot. So I can see some of
08:06
that. So now I can just edit. And so if I want to, for example, take this video and
08:15
put it right here in the middle of the screen and maybe resize it down a little bit, it’s
08:20
easy to just move that. Or if I want to go out here, let’s say farther, right here at
08:26
this point in the video, I’m actually going to show you the things down on the bottom
08:30
of my screen. So what I could do, play that, so now I could zoom in to this at the bottom.
08:36
So I’m going to click here add a video action and now I’m just going to simply zoom in to
08:42
the bottom. And so you can see the things on the bottom. And then maybe I want to move
08:49
my head up a little bit so I’m going to add a video action to that. Move my head up here.
08:51
And then I could play that. “The first thing I’m in is something called Keynote. This is
08:57
similar to PowerPoint . . . ” I could also do things that I talked about before. Like
09:01
I go to my audio and I could mix it to mono. I can also do things like increase the size
09:10
of the cursor. So I can make that, down here, make that mouse pointer bigger when it’s on
09:16
the screen. And I can do other things like add text. I can add images. I can video like
09:25
that. And so if we go back and look at what it looks like now at this point. “And so the
09:30
software that I’m going to run is three-fold. The first thing I’m in is something called
09:34
Keynote.” Okay. Now once I have the video the way that I want it, the neat thing about
09:39
ScreenFlow is I can simply publish it to YouTube. I put in my information and my password, sign
09:45
in and it’s going to take care of compressing the video, uploading it to YouTube. And then
09:50
I’m pretty much done. And so that’s Screen Flow. And that’s my walk-through of screen
09:55
casting. And I hope that’s helpful.
—
This post was previously published on YouTube.
—
Photo credit: Screenshot from video.

.